These tutorials were created by members of the Digital Humanities at Claremont Colleges (DH@CC) team during the five-year Mellon-funded digital humanities initiative (2015-2020).

Scalar is a free, open source authoring and publishing platform that allows you to individually or collaboratively create multimodal, born-digital scholarship. The DH@CC Team has produced a Quick Guide to help you start writing and publishing with Scalar.

For more information about access to Scalar, or to set up a consultation, contact DigitalScholarship@claremont.edu.

Quick Links

Quick Guide to Scalar: A Google Docs copy of the Quick Guide provided on this page.

DH@CC Scalar Video Tutorials: A playlist of short videos created by the DH@CC Team to teach you the basics of Scalar.

Digital Claremont: The Claremont Colleges Library’s Scalar installation.

Quick Guide to Scalar

Scalar is a free, open source authoring and publishing platform for long-form, born-digital scholarship. Scalar enables users to assemble media from multiple sources and juxtapose them with their own analysis.

Minimal technical expertise is required to use Scalar, but users with more advanced skills are able to experiment with customizing their Scalar projects.

The Claremont Colleges Library maintains its own installation of Scalar. Contact DigitalScholarship@Claremont.edu for more information about registering for an account.

Scalar Account Dashboard

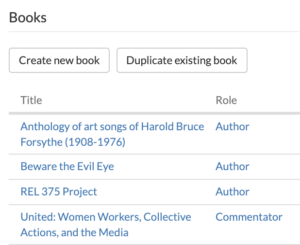
After you log into your Scalar account, you’ll be brought to your Account Dashboard. There, you’ll have the opportunity to create a new book, duplicate an existing book, or navigate to an existing book.

  • Note that when creating a new book, the title will be automatically converted into a url for the project, so you’ll want to keep that short and sweet. You can always change the title later, but you cannot change the url.
  • Also note that there is no easy way for users to delete Scalar books, so think carefully before you create a book.

For each Scalar project, you’ll also have access to a Book Dashboard.

  • From the Properties tab on your Book Dashboard, it is important to consider Permissions for your Scalar book. Of note, checking No login required will make your Scalar book publicly accessible.
    Scalar Permissions Options
  • From the User tab on your Book Dashboard, you can add or delete users, and set their roles. Note that when adding users to your book, you’ll need to know their Scalar username.
  • When navigating your Scalar book, clicking the Dashboard Icon in your Scalar Header Bar will always bring you back to your Book Dashboard.

Pages are the basic building block of every Scalar book. Everything you create will be a distinct Page. There are two ways to create Pages:

  • From the Content tab on your Book Dashboard, click the Add new page button at the bottom of your Pages list.
  • From any Page in your Scalar book, click the New Icon in your Scalar Header Bar.

In Edit Mode, you’ll have the opportunity to experiment with different Layouts and Styling. Additionally, you’ll be able to add appropriate Metadata so that a Page can be formatted properly for certain Layouts and Widgets.

It’s important to remember that Scalar is not a substitute for a good word processor. While it’s possible to compose text directly in Scalar, we recommend copying and pasting text from your word processor. You can copy and paste text in two ways:

  • To paste as plain text, copy the appropriate text from your word processor, click into the Scalar editor, and click the Paste as plaintext button.
  • To paste from Word, copy the appropriate text from Word, click into the Scalar editor, and click the Paste from Word button.

After you’ve added content to a Page and saved it, you may want to go back and edit that Page. To edit a Page:

  • Click the Edit button in your Scalar Header Bar.
Scalar can support audio, video, and still image Media in a variety of different formats. Remember that each Media asset will also be a distinct Page. You can import Media into your Scalar book in two ways:

  • From the Content tab on your Book Dashboard, click the Import Media drop down  menu at the bottom of your Pages list. From that dropdown, you can choose to search an affiliated archive, upload a file from your own device, or add the URL.
  • From any page in your Scalar book, explore the same options from the Import menu in your Scalar Header Bar.
  • Some important things to remember about importing media:
    • Media files uploaded into Scalar must be less than 2 MB.
    • Media from affiliated archives and URLs are not always stable. If the institution or user decides to change its rules of access, you may not have access to this asset in your Scalar book.

Once you’ve imported a Media asset into your Scalar book, there are two ways to insert it into a Scalar Page:

  • If you would like your Media asset to be associated with a particular piece of text on your Page:
    • Highlight that text.
    • Click the Insert Scalar Media Link icon in your Editor Header.
  • If you would like your Media asset to stand alone:
    • Place your cursor in the appropriate location.
    • Click the Insert Inline Scalar Media Link icon in your Editor Header.
  • With either of these methods, you’ll have the opportunity to set the size, alignment, caption, text wrapping (for inline Media), and annotations (for Media that have Annotations).

One of the most powerful features of Scalar gives you the opportunity to add Annotations to your Media. Remember that each Annotation is also a distinct Page. To add an Annotation:

  • From the Content tab on your Book Dashboard, select Media from the dropdown menu at the top left and click on the title of the Media asset that you would like to annotate.
  • Click the Annotate button in your Scalar Header Bar.
  • The interface will be slightly different for audio, video, and still images.
    • For audio, while playing the clip, create a new annotation using the plus button, or select an existing annotation from the list to edit.
    • For video, while playing the clip, create a new annotation using the plus button, or select an existing annotation from the list to edit.
    • For still images, click and drag on the image to create a new annotation, or select an existing annotation from the list to edit.
  • Remember that when you’re inserting a Media asset into your Scalar Page, you’ll have to choose which annotations you’d like to include.

As an author, you’ll want to provide some sort of structure to your Scalar book. Before you approach this task digitally, it helps to grab a pen and paper or head to your nearest white board and outline what you’d like your Scalar book to look like. Digitally, there are two main ways to provide structure in Scalar:

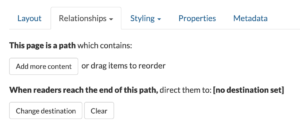
  • Path is a linear sequence of content, similar to pages in a book. Because each Path is also a distinct Page, you’ll create a Path by navigating to the Page that you’d like to be the first in that Path:
    Scalar Path Options

    • Click the Edit button in your Scalar Header Bar.
    • From the Relationships tab, select Path.
    • Choose the Pages that you’d like this Path to contain. Note that you can adjust the order and add additional Pages to your Path as your Scalar book evolves, but always fall back on your original outline.
    • Choose the final destination for your Path.
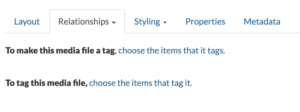
  • Tag is a non-linear grouping of content. Because each Tag is also a distinct Page, you’ll create a Tag by navigating to the Page that you’d like to be a Tag:
    Scalar Tag Options
    • Click the Edit button in your Scalar Header Bar.
    • From the Relationships tab, select Tag.
    • Choose the Pages that you’d like this Tag to tag. Note that you can tag additional Pages as your Scalar book evolves, but always fall back on your original outline.
    • Note that you can also add a Tag to a Page from the Relationships tab.

There might be times when you’d like additional information to supplement the narrative in your Scalar book. Notes, like footnotes or endnotes, allow you to do this in Scalar. To create a Note, navigate to the Page that you’d like to contain the Note:

  • Click the Edit button in your Scalar Header Bar.
  • Highlight the text you’d like to be associated with this Note
  • Click the Insert Scalar Note icon.

Here, you’ll be able to select existing content, but more likely you’ll want to Create page on-the-fly.

  • It is much easier to use Scalar if you have a good idea at the start of your project about what you’d like your book to look like and consist of, especially if you are working on a Scalar book collaboratively. Be sure to spend time drafting a detailed outline of your Scalar book before you begin to build it.
  • Be consistent with your Page titles and descriptions, especially if you are working on a Scalar book collaboratively. These can help keep you and your co-authors organized throughout your working process.
  • Metadata can be a powerful tool that facilitates the use of certain Layouts and Widgets. Be sure to add Metadata to Pages as you’re creating them.
  • Remember to be creative! Scalar is one of the only platforms that allows you to create complex non-linear, multimodal narratives, so we encourage you to take advantage of the flexibility that the platform offers!

Scalar User’s Guide – A thorough how-to manual written and maintained by the creators of Scalar.

Scalar Demo Projects – A list of demo projects curated by the creators of Scalar.

Quick Guide to Scalar: A Google Docs copy of this Quick Guide.

Scalar Video Tutorials