Zotero Guide
Learn how to use the basic features of Zotero to manage your citations
Zotero (pronounced “zoh-TAIR-oh”) is free application that collects, manages, and cites research sources. Zotero allows you to attach PDFs, notes and images to your citations, organize them into collections for different projects, insert citations into Word documents, and create bibliographies. To get started, watch the video tutorial below.
Need a walkthrough? Watch this quick tutorial.
Explore the core features
To use Zotero, you will need to install two things:
- The Zotero application
- A connector to allow your browser to save citations to Zotero.
Both of these are available from the Zotero download page.
Zotero saves references from most library catalogs (including The Claremont Colleges Library Search) and databases, and even many regular web pages, with one click.
When Zotero detects that you’re looking at a book or article on a catalog, database, or a site like Amazon.com, you’ll see a book or page icon appear in or near the address bar of your browser. Just click the icon and Zotero will automatically save the citation. Zotero will import your citation into the last folder you had open.
Make sure Zotero is open before you begin to save citations; otherwise you will get an error message and the option to save it to your online account.
Tips for organizing your citations:
- You can create folders to organize your citations. Citations can be present in more than one folder at a time.
- You can also organize your citations using tags, notes, or the related function.
- It’s easy to attach files (like PDFs) to items in your Zotero library. Just drag the file into your Zotero pane. Dropping a file onto a collection, or in between library items, will copy it into your library as a standalone item.
- Dropping it onto an existing item will attach it to that item. This is the easiest way to attach a copy of an article to its entry in your library.
It’s easy to create a bibliography from your Zotero library.
- Select the references or collections you want to include.
- Hold the control key and click to select multiple items. Right-click one of the selected items and choose Create Bibliography.
- Choose the bibliographic style you want, and select the output format: Save as RTF or HTML, copy to clipboard or print. (The RTF file format is compatible with all word processors.)
Or you can drag and drop references from Zotero into your document and they will turn into fully formatted citations. This works with any word processor including Google Docs. Change the default style under Preferences on the “gear” menu.
The word processing plugin adds a Zotero toolbar to either Microsoft Word or Google Docs that allows you to add formatted citations to your document while you write.
To add a citation, click the first button (“Insert Citation”) on the toolbar. Select the reference you want to cite and click OK. Zotero will add the citation at your cursor.
At the end of your paper, click the third button (“Insert Bibliography”). Your bibliography will appear, and new citations will be added automatically. Change bibliographic styles with the last button on the toolbar (“Set Doc Prefs”).
If you use Word for Mac, the Zotero Toolbar is located in different places depending on your operating system:
- If you’re using MS Word 2016 for Mac, the Zotero Toolbar is found in the Add-ons tab.
- If you’re using MS Word 2011 for Mac, you’ll need to make your Zotero toolbar visible by enabling it through the “View” menu.
- If you are using MS Word 2008 for Mac, then Zotero is installed in the script menu (to the right of the Help menu at the top of the screen).
The Zotero Toolbar is located at the end of the regular toolbar in Google Docs.
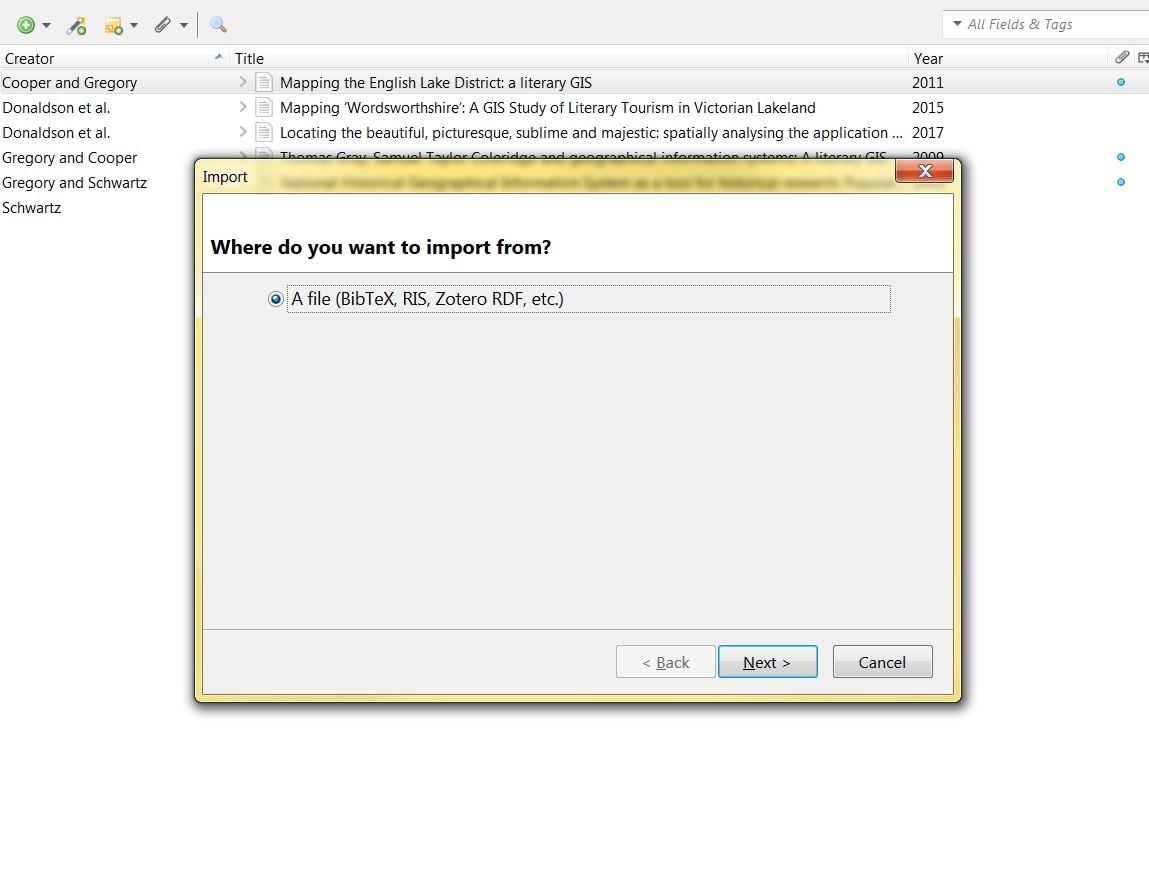
1. Open your new citation manager (in this case, Zotero) and go to File > Import. A dialogue box will come up and ask where you want to import from. Select A FILE (which should be the only option).
2. Select NEXT and you will be brought to your downloads folder. Select the correct document (it will be labeled export.bib) and click OPEN. Follow the dialogue box and your imported citations will be placed in a new folder called “export.” From there, you can rename and manipulate your imported documents any way you like. Folder names do not carry over from RefWorks, so you’ll need to rename your folders once they are in Zotero.
Syncing your library backs up your library on the Zotero server, and enables you to use Zotero on more than one computer.
After you set up up a free Zotero.org user account, open the Zotero Preferences window and navigate to the Sync tab. Enter your Zotero.org username and password.
Check the “sync automatically” box, and check both boxes under File Syncing and choose Zotero storage for My Library. This will sync your PDF attachments as well as citations (more info).
Zotero will upload your library to their server.
In addition to automatic syncing, you can sync manually at any time by clicking the “Sync with Zotero Server” button on the right-hand side of the Zotero toolbar.
If you own more than one computer, repeat this configuration on each of your computers. Any updates you make on one of your computers will be reflected on the others.
For more details and help troubleshooting sync problems, check the Zotero site.
Zotero allows you to export the data out of your library. You may want to do this for a number of reasons. If you’re working on a different computer than you normally use, you can export your library and take it with you to another machine. Or you can export your library and import your citation data into another citation manager.
Within the citation library, select the item(s) you wish to export, then right-click to open the sub-menu. From here, select “Export Items”.
In the pop-up window, click the Format box to select your export file type. This file is what will be imported into another citation manager or computer with Zotero.
- RIS (Research Information Systems) format can be imported into numerous citation managers, including EndNote, Mendeley, and RefWorks.
- RefWorks Tagged can also be imported to Refworks, and will include your relevant tagging information.
A window will appear asking you where you would like to save the export file. Once selected, click Save File.
To import the exported Zotero file, please follow the steps listed in your new citation manager’s guide.
You can also export your entire library by selecting the Zotero gear menu, choosing Export Library, and saving the file to a USB drive or importing it into another citation manager.
Get This Item
You’ve probably seen the Get This Item button in some article databases that allows you to locate the full text of an article online. Zotero allows you to use the same feature with the Locate button enables you to locate the online full text of an item in your Zotero library.
To set up Zotero to access the Get This Item server, click the Gear button on the Zotero toolbar and choose Preferences. At the bottom of the Advanced preferences window, paste this link: https://ccl.on.worldcat.org/atoztitles/link? into the “Resolver” box, then click OK. Once you’ve set this up, you can click the Locate button on any citation you’re viewing to search for the item online.
Adding items by ISBN
Have the book in front of you and want to add it to your Zotero library without having to search for a citation?
If you have a book’s ISBN, or an online article’s DOI or PMID number, just click the magic wand button: “Add item by identifier.” Type in the book or article’s number, and Zotero will automatically download its information and save it to your library.
Indexing PDFs
It’s easy to add PDFs to your Zotero library and automatically import their citation info.
First, enable PDF indexing on the Search tab of Zotero’s preferences. Zotero will download and install a small plugin.
Next, just drag your PDF files into the Zotero pane.
Right-click the PDFs and choose “Retrieve Metadata for PDFs.” Zotero will retrieve their citation data from Google Scholar and turn them into cite-able items with PDF attachments.
If Zotero can’t find a match on Google Scholar, don’t worry — you can still save the citation from another catalog or article database, then drag the PDF onto the citation to make it an attachment.
Apple has discontinued support for full-featured Safari extensions in Safari 12, which means there is no Zotero extension for Safari 12.
To continue using Zotero with Safari 12, install the Zotero Bookmarklet. The bookmarklet will allow you to save items to your online library, and Zotero will then sync those items down to your computer.
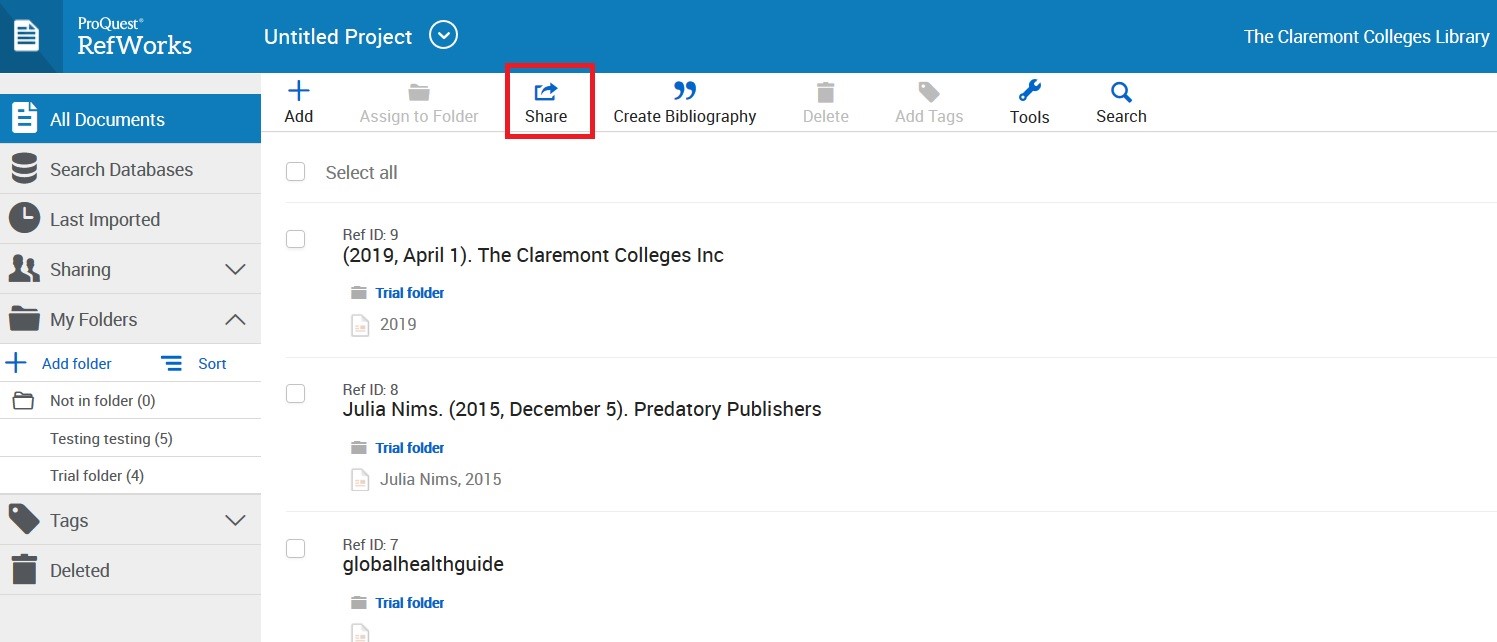
1. From your RefWorks account, click SHARE in the top menu bar.
2. Select EXPORT REFERENCES.
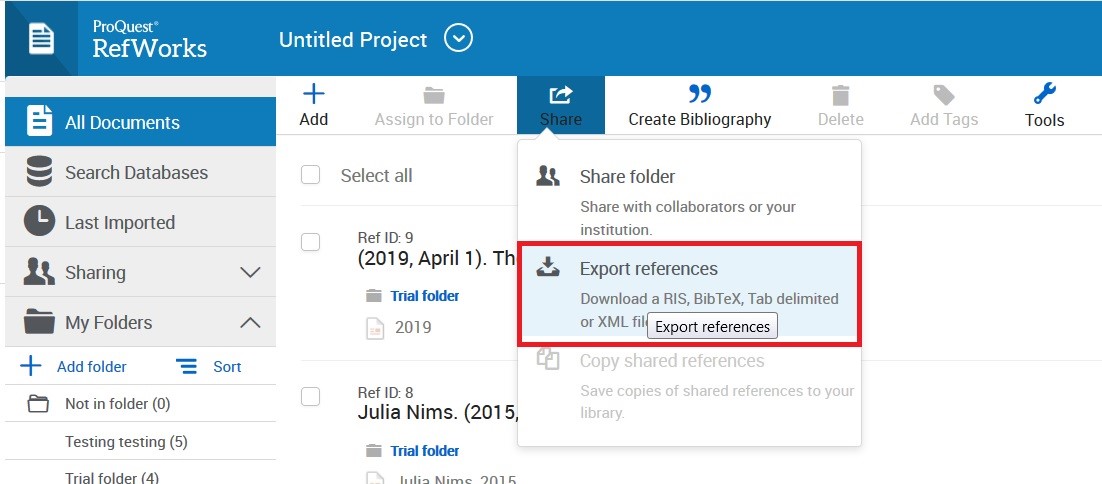
3. Choose to export all references in the document and export in BibTeX format.
-
- Unfortunately, batch export does not preserve your folder structure, so if you want to preserve your folders from RefWorks, you will need export and import one folder at a time.
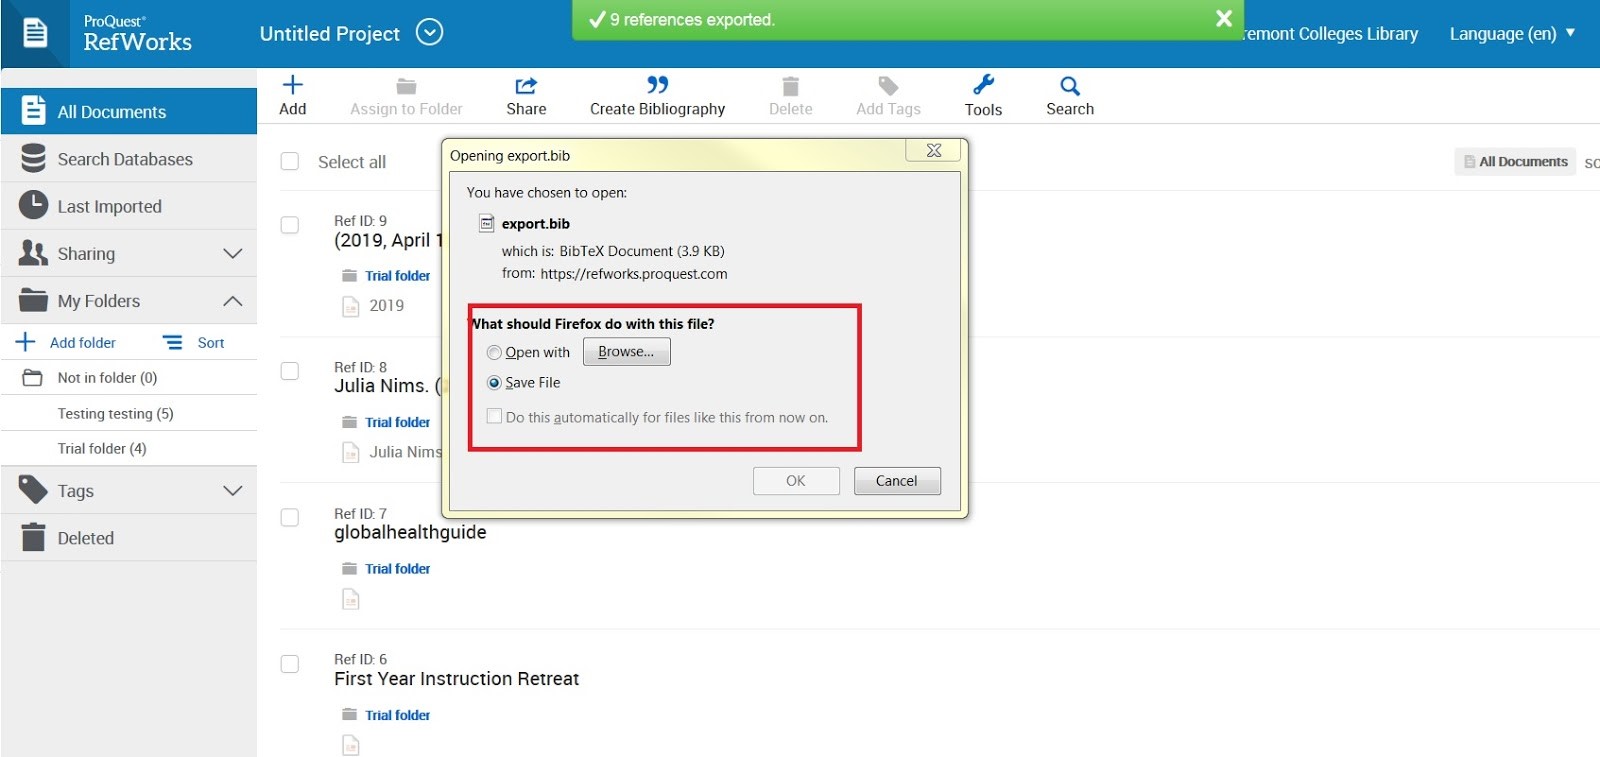
4. Click EXPORT and choose to save the file. Your exports will download and will be placed in your downloads folder.
Got questions? We’ve got answers